A very merry Dining Room Reveal!

We actually finished wallpapering our dining room in October, but it took me a while to photograph it. The lighting is terrible (as you'll soon see), so I needed to find the right balance of artificial light, natural light, tidiness and free time to take the photos.

And, as it happens to be December, it's decorated for Christmas! So here we go.

This is the view in from our living room.


This is good real life representation of the colour of the wall paper. The paper is called Rothbury Trellis, by Thibaut. The colour is metallic on slate gray.


Put on your sunglasses for this next shot people! The view from our hallway into the dining room. And whoops, a plastic bag full of stuff hiding behind the chair.
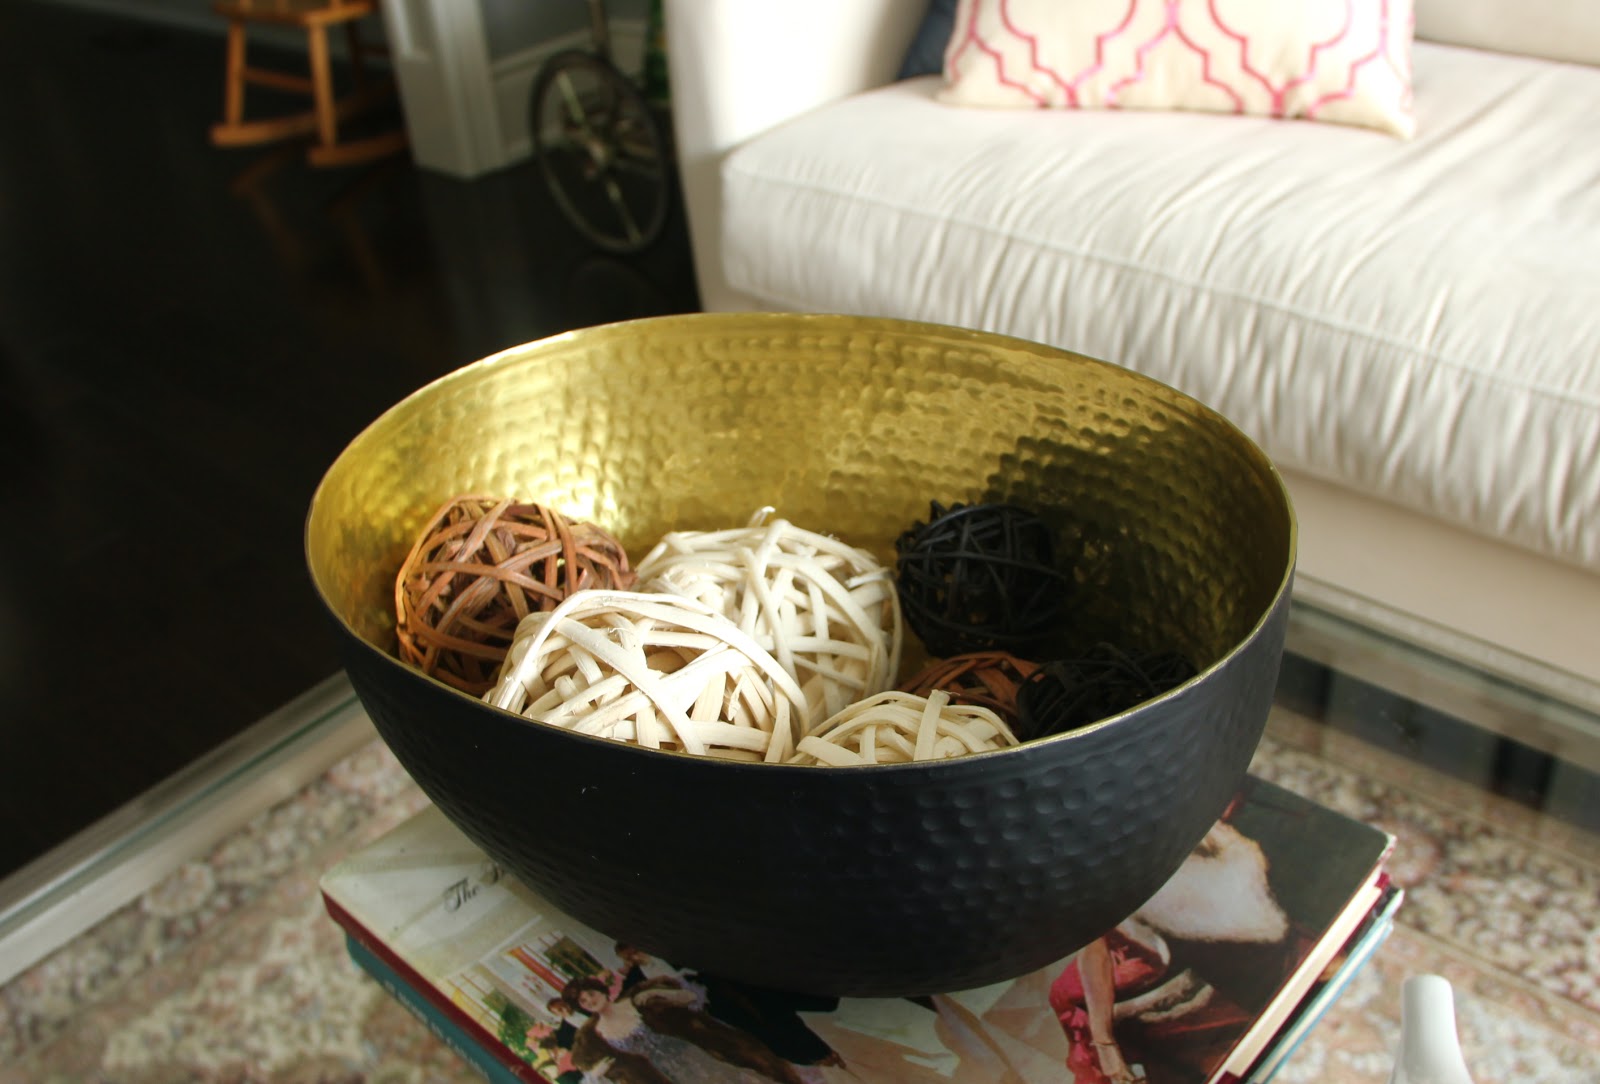


The buffet.


My deer head bowl from the William Ashley warehouse sale and Mr. Fox.

     My daughter pronounced x's with a hard k sound for a while. It made Mr. Fox a hilarious thing to talk about.                      Go ahead, sound it out.

My husband's ever expanding whiskey and scotch collection. He keeps receiving bottles as gifts but hardly ever actually drinks it. He loves it though. Good to have on hand during the holidays for sure.

My daughter's hand print ornament from her first Christmas last year.

I dunno. I like this guy. He's cute.
Sparkly snowflake from HomeSense.


Another holiday necessity, a well stocked wine rack.


I bought this Santa wine bottle (or tree??) topper at The Bay years ago. Any of you that shop at The Bay have a story like this. Saw it, looked at the price tag, which said something like $9.99. Go to the cash register, it rings through at $1. The Bay is notorious for this.

It adds some fun to the room. We try not to take ourselves too seriously. 


I hope you like this dining room makeover! There was quite a bit of blood, sweat and tears that went into this room (without any actual blood or tears. Some sweat for sure though).

The before-before again, for dramatic effect:


Then the more recent before, post DIY wainscoting:


And the after:


One last poorly lit parting shot. Because why not.


Turning an old wine case into a Christmas centrepiece

I was at my parent's house for dinner and noticed this wooden wine bottle crate sitting in their 'junk to get rid of' pile. They actually used it as a CD tower in their living room for years. It says Napa Valley on the side. No one in our family has ever been to Napa Valley so I don't have a clue where they got it.

Inspired by this pin, I decided to make a Christmas centrepiece out of it.


A couple of empty mason jars,


some pine branches and pine cones from Superstore,


...and some leftover faux-berries from our garland and there you have it! Throw in some tea lights and you have a DIY Christmas centrepiece made for just a few dollars.


Sharing at:


DIY Show Off DIY Holiday Highlights

ReStore Find: Occassional Chair [After]

I have never made over an actual peice of furniture before. What you are about to witness is a beginner's makeover of a chair that was on it's last life anyways (nothing to lose).

I picked up this chair for $25 from my local ReStore. The wood is gouged in places, and it wobbles. It was made for tiny people in the olden days who sat up straight and had healthy BMI's.


First I removed the seat. It unscrewed easily and I got to work peeling off the strips of florescent duct tape.

Then I picked out tons of tetanus laden rusty staples. Seriously I was so paranoid. Even though I think I'm up to date on my tetanus vaccinations, I was still scared. I got a tiny scratch and ran screaming to the sink to scrub it with antibacterial soap.


The previous seat was pretty hard and uncomfortable (the padding was hay or something. I didn't take a picture because it was gross and I just wanted it out of my house), so I added a layer of memory foam to the plywood.


Then I wrapped it with thin batting, and (clumsily) stapled it down.


[Note: I had to UNstaple the above batting twice because a) I had unevenly pulled the batting so the edges were lumpy, and b) I covered the holes that you screw into to secure the seat. It's all about trial and error!]

Next, I stapled on the fabric, after moving it around several times to make sure pattern on the top of the seat wasn't crooked.


Doesn't that look so professional?? HA HA.


This is what us novice furniture restorers like to call "Good Enough".

FYI, the fabric is called Greek Key in Buff, and I ordered it from Tonic Living.

The wood was quite damaged, and I'm not a professional wood rehabilitator (is that a thing?) so I reached for the white paint. Several coats later, I reattached the seat, and voila!


Not bad for a first timer right? (Please say right).

Pinterest fun at naptime

My daughter doesn't always nap in the afternoon, but when she does I try to spend part of it doing something relaxing. Nap time can't be all netflix and internet surfing floor mopping and toilet cleaning!! Am I right? Ha.

Inspired by this pin (note, link goes nowheresville):

http://pinterest.com/pin/181058847490679832/


I picked up some Christmas scrapbook paper, grabbed a fine tip black pen, and I copied the idea detail for detail.


Not my idea at all but a fun way to spend nap time and add some personality to gifts this Christmas!

William Ashley Warehouse Sale and more Wainscoting plans!

This past weekend was spent checking out sales around Toronto. First we headed to 1212 Decor's liquidation sale, lured by the promises of 50% off furniture and art, and 40% off accessories. We had fun browsing, but left empty handed as 50% off a chair that was $4000 to begin with is certainly no bargain to us!

Photo from 1212decor.com

On Sunday we headed to William Ashley's warehouse sale. This was my first time going but it's an annual event that draws quite the crowd. We we arrived we saw they had portable washrooms and a tented line-up which surprised me (and turned me off). We waited about half an hour to get in, and I was second guessing our decision the entire time. However the controlled entry actually made browsing inside tolerable. It was slammed but people weren't grabby or pushy and there were literally staff members everywhere to help.

We went because we've been looking for a formal flatware set for a while now, and totally scored! We bought this 60 piece (12 place settings) stainless steel for just under $300, down from around $800.


I also found this awesome deer head bowl for $20.


 Some Christmassy tea towels (don't remember how much, maybe $3.99?)


And my birthday present, a 6.75 Le Creuset oval french oven. It was $219, down from $375!!


They also had tons of Christmas decorations, but by the time we got there we were both a little exhausted. Good times though!

We also began installation of (faux) wainscoting in our kitchen/family room this weekend. We love how it looks in our dining room so much that our plan is to slowly add moldings to the rest of the house over the next few years.

It will help to break up and add character to the somewhat stark walls we have in our kitchen.

Here is our little office area/computer station (which doesn't get used because that is not a proper desk and it's uncomfortable to sit at):


And we're also installing the moldings over here, next to our kitchen table. 


One day I'll show pictures of my whole kitchen on here, but I can't do that until I can successfully clear the piles of dirty dishes and stacks of mail off the surfaces for once in my life. 


Lightened up Living Room [reveal]

This was what our living room looked like right after we moved in, without changing the paint colour, and using everything we had brought from our old house.

The paint colour. It was in the beige/brown family. I don't know what colour it was. I lovingly referred to it as 'poop water'. (did you just throw up in your mouth a little? I can be a bit crass.)

I wanted it lightened up.


And here's what it looks like now, with new art, new bar cart/side table and most importantly, a fresh coat of paint!


The colour is Benjamin Moore Stonington Gray. 

I think this photo is the most accurate representation of the true colour:


Side note/dilemma: This side of the room screams for window treatments to warm it up, but given the completely odd shape of our bay window, I can't even imagine how I would do that. Plus, it's the only source of light from the front of the house, and I'm scared to take any sunlight away. (Currently the california shutters do a serviceable job of letting light in and maintaining privacy).

Oh and I also added this bowl - found at Ikea! Amazing!


Little reading area.


And a sneak peak into our freshly wallpapered dining room. The dining room is a bit cave like, with no natural light, and as soon as I figure out how to photograph it without it looking like a still from a horror movie, I will.


It's better now, right? Obviously paint colour can change the whole vibe of a room, and it's definitely more 'us' now.


ReStore Find: Occasional chair (before)

On the heels of my fun bracelet stand find at Goodwill, I was inspired to keep thrift store treasure hunting. Our house is still half empty, and we're not really wanting to make huge expenditures at the moment, so we're leaving it like that. It is just the three of us after all.

There is no harm in collecting some used pieces for cheap though! I found this chair at my local ReStore for $25. That actually might be kind of expensive for this chair, I really have no idea. I also really don't care since I think Habitat is a pretty great charity and if my $25 helps pay for part of a house it's all good. Karma, baby.

I just saw great legs, a pretty back and a fairly straightforward re-upholstery job for a complete beginner like me.


Check out what the previous owners chose for the upholstery - I believe that is florescent zig-zag duct tape folks. NICE. Do not adjust your screen.

Won't you take me to...Funky Town???

I've ordered this fabric from Tonic Living:


I'm also planning to paint the chair white.

I think I'd like this chair to live in our guest room, or perhaps in our master bedroom in my future makeup/vanity table area. We'll see!

Goodwill find: Bracelet stand! [Before and After]

I haven't posted in a while. I really want to photograph and post about our newly painted and wallpapered living/dining rooms (bye bye poop walls!) however I haven't been able to coordinate photographing and sunny conditions. It's been gloomy.

In the meantime, I wanted to share this fun small victory. I was dropping off some old clothing to our local Goodwill the other day, and decided to pop in. I don't know why as I never, ever find anything good. But I spotted this hand towel stand immediately:


It's the perfect jewellery stand/bracelet holder thingy! For $2!

I've seen other bloggers turn hand towel stands into bracelet stands before (can't remember where off the top of my head) so this is by no means innovative. But I do need somewhere put my bracelets! My dresser top is a hot mess! The bird cage I'm currently using to house my necklaces and bracelets is actually the worst thing ever. It has so many jagged edges in the design that everything gets tangled up in.


This little guy has a marble base (sweet!), however it's covered with a giant rust stain (boooo!).


I tried a baking soda poultice...lemon juice and baking soda...the stain wasn't budging.

So out came the spray paint! Rustoleum in Gloss White for the base, and a coat of Design Master Modern Metals in Champagne Silver for the top just to brighten things up.

And voila! A place to rest my bracelets. When they're not having a party on my arm.


Popular Posts